Page 6 - Read Online
P. 6
Romano et al. Soft Sci 2024;4:31  https://dx.doi.org/10.20517/ss.2024.24         Page 3 of 15

               EXPERIMENTAL
               Design and fabrication
               We designed magnetic soft pressure sensors [Figure 1A and in Supplementary Section 1]. Each sensor
               comprises the following components: (i) a Hall effect sensor; (ii) a magnet (NdFeB, N45) with axial
               magnetization (dimensions: 1 mm height, 1 mm diameter); and (iii) a soft polymeric medium. While the
               Hall sensor and magnet remained unchanged, the polymeric medium varied in shape and material to
               modulate the sensor’s stiffness. Externally, the polymeric medium was cylindrical (height: 8 mm, diameter:
               8 mm), with variations in the internal configuration: 1. lacking an inner air chamber (FULL shape);
               2. featuring a domed inner air chamber (DOM shape); and 3. having a cylindrical inner air chamber (CIL
               shape). We employed Ecoflex 00-50 (Eco50) and Ecoflex 00-30 (Eco30), along with three custom materials.
               These custom materials were formulated by mixing Eco30 with Silicone Thinner at different concentration
                                                                                           TM
               levels: 10% (Eco30t10), 20% (Eco30t20), and 25% (Eco30t25) of the total volume. Ecoflex  rubbers, which
               are platinum-catalyzed silicones, consist of two components: Part A and Part B. To produce the soft sensors,
               these components were combined in a 1A:1B volumetric ratio, according to the manufacturer’s guidelines.
               For Eco30t10, Eco30t20, and Eco30t25, 0.050, 0.100, and 0.125 g of Silicone Thinner, respectively, were
               added to decrease the sensors’ stiffness. All materials were then degassed using a vacuum/pressure pump
               (model VCP 130, VWR International, LLC, PA, USA) for ten minutes to eliminate air bubbles. Next,
               negative molds were created using 3D-printed polylactic acid (PLA). The prepared materials were poured
               into the molds, and the magnet was embedded in the soft medium at 2 mm from the Hall sensor. The entire
               sensor production process is illustrated in Supplementary Figure 1. When a uniform force is applied to the
               upper surface of the soft medium, it deforms, reducing the gap between the magnet and the Hall sensor
               [Figure 1B]. This compression alters the magnetic field detected by the Hall sensor [Figure 1C]. The
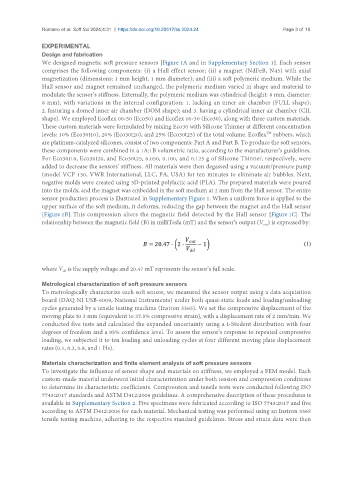
               relationship between the magnetic field (B) in milliTesla (mT) and the sensor’s output (V ) is expressed by:
                                                                                          out


               where V  is the supply voltage and 20.47 mT represents the sensor’s full scale.
                      dd
               Metrological characterization of soft pressure sensors
               To metrologically characterize each soft sensor, we measured the sensor output using a data acquisition
               board (DAQ NI USB-6009, National Instruments) under both quasi-static loads and loading/unloading
               cycles generated by a tensile testing machine (Instron 3365). We set the compressive displacement of the
               moving plate to 3 mm (equivalent to 37.5% compressive strain), with a displacement rate of 2 mm/min. We
               conducted five tests and calculated the expanded uncertainty using a t-Student distribution with four
               degrees of freedom and a 95% confidence level. To assess the sensor’s response to repeated compressive
               loading, we subjected it to ten loading and unloading cycles at four different moving plate displacement
               rates (0.1, 0.2, 0.8, and 1 Hz).


               Materials characterization and finite element analysis of soft pressure sensors
               To investigate the influence of sensor shape and materials on stiffness, we employed a FEM model. Each
               custom-made material underwent initial characterization under both tension and compression conditions
               to determine its characteristic coefficients. Compression and tensile tests were conducted following ISO
               7743:2017 standards and ASTM D412:2006 guidelines. A comprehensive description of these procedures is
               available in Supplementary Section 2. Five specimens were fabricated according to ISO 7743:2017 and five
               according to ASTM D412:2006 for each material. Mechanical testing was performed using an Instron 3365
               tensile testing machine, adhering to the respective standard guidelines. Stress and strain data were then

