Page 45 - Read Online
P. 45
Dela Cruz et al. Microstructures 2023;3:2023012  https://dx.doi.org/10.20517/microstructures.2022.33  Page 5 of 25

                                                                                                     2
               AZtec 3.3 and then analysed using the AZtecFlex software suite. For EBSD analysis, a 500 × 500 μm  area
               was scanned at a step size of 1 μm and only the results with at least 90% hit rate were analysed. Data cleaning
               was done by removing the wild spikes, and then using the “zero solutions removal” tool from level 1 up to
               level 4 while preserving any defects, i.e., cracks and pores, on the cleaned dataset. The grain size and shape
               analysis were subsequently done on the computed prior austenite grains  using the Shoji-Nishiyama
                                                                                [40]
                                   [41]
               orientation relationship  to reveal the likely austenite grains.
               Simulation of melt pool thermal properties
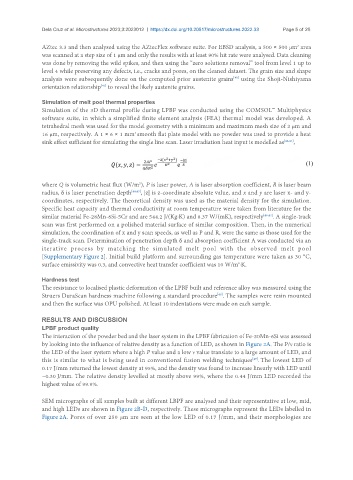
               Simulation of the 3D thermal profile during LPBF was conducted using the COMSOL™ Multiphysics
               software suite, in which a simplified finite element analysis (FEA) thermal model was developed. A
               tetrahedral mesh was used for the model geometry with a minimum and maximum mesh size of 2 μm and
               16 μm, respectively. A 1 × 6 × 1 mm smooth flat plate model with no powder was used to provide a heat
                                              3
               sink effect sufficient for simulating the single line scan. Laser irradiation heat input is modelled as [42,43] ,


               where Q is volumetric heat flux (W/m ), P is laser power, A is laser absorption coefficient, R is laser beam
                                                2
               radius, δ is laser penetration depth [44,45] , |z| is z-coordinate absolute value, and x and y are laser x- and y-
               coordinates, respectively. The theoretical density was used as the material density for the simulation.
               Specific heat capacity and thermal conductivity at room temperature were taken from literature for the
               similar material Fe-28Mn-6Si-5Cr and are 544.2 J/(Kg∙K) and 8.37 W/(mK), respectively [46,47] . A single-track
               scan was first performed on a polished material surface of similar composition. Then, in the numerical
               simulation, the coordination of x and y scan speeds, as well as P and R, were the same as those used for the
               single-track scan. Determination of penetration depth δ and absorption coefficient A was conducted via an
               iterative  process  by  matching  the  simulated  melt  pool  with  the  observed  melt  pool
               [Supplementary Figure 2]. Initial build platform and surrounding gas temperature were taken as 30 °C,
                                                                                 2
               surface emissivity was 0.3, and convective heat transfer coefficient was 10 W/m ∙K.
               Hardness test
               The resistance to localised plastic deformation of the LPBF built and reference alloy was measured using the
               Struers DuraScan hardness machine following a standard procedure . The samples were resin mounted
                                                                          [48]
               and then the surface was OPU polished. At least 10 indentations were made on each sample.


               RESULTS AND DISCUSSION
               LPBF product quality
               The interaction of the powder bed and the laser system in the LPBF fabrication of Fe-30Mn-6Si was assessed
               by looking into the influence of relative density as a function of LED, as shown in Figure 2A. The P/ν ratio is
               the LED of the laser system where a high P value and a low ν value translate to a large amount of LED, and
               this is similar to what is being used in conventional fusion welding techniques . The lowest LED of
                                                                                      [49]
               0.17 J/mm returned the lowest density at 95%, and the density was found to increase linearly with LED until
               ~0.30 J/mm. The relative density levelled at mostly above 99%, where the 0.44 J/mm LED recorded the
               highest value of 99.9%.


               SEM micrographs of all samples built at different LBPF are analysed and their representative at low, mid,
               and high LEDs are shown in Figure 2B-D, respectively. These micrographs represent the LEDs labelled in
               Figure 2A. Pores of over 250 μm are seen at the low LED of 0.17 J/mm, and their morphologies are

