
Page 41 - Read Online
P. 41
Page 6 of 14 Grewal et al. Plast Aesthet Res 2021;8:37 https://dx.doi.org/10.20517/2347-9264.2021.43
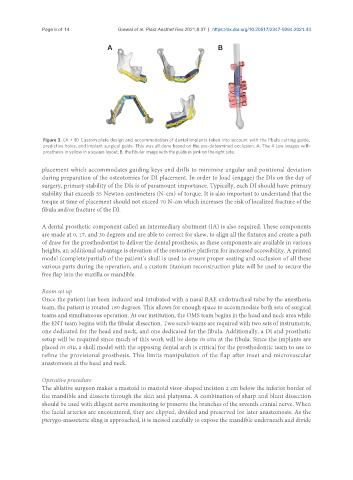
Figure 3. (A + B) Custom plate design and accommodation of dental implants taken into account with the fibula cutting guide,
predictive holes, and implant surgical guide. This was all done based on the pre-determined occlusion. A: The 4 Jaw images with
prosthesis in yellow in a square layout; B: the fibular image with the guide in pink on the right side.
placement which accommodates guiding keys and drills to minimize angular and positional deviation
during preparation of the osteotomies for DI placement. In order to load (engage) the DIs on the day of
surgery, primary stability of the DIs is of paramount importance. Typically, each DI should have primary
stability that exceeds 35 Newton centimeters (N-cm) of torque. It is also important to understand that the
torque at time of placement should not exceed 70 N-cm which increases the risk of localized fracture of the
fibula and/or fracture of the DI.
A dental prosthetic component called an intermediary abutment (IA) is also required. These components
are made at 0, 17, and 30 degrees and are able to correct for skew, to align all the fixtures and create a path
of draw for the prosthodontist to deliver the dental prosthesis, as these components are available in various
heights, an additional advantage is elevation of the restorative platform for increased accessibility. A printed
model (complete/partial) of the patient’s skull is used to ensure proper seating and occlusion of all these
various parts during the operation, and a custom titanium reconstruction plate will be used to secure the
free flap into the maxilla or mandible.
Room set up
Once the patient has been induced and intubated with a nasal RAE endotracheal tube by the anesthesia
team, the patient is rotated 180 degrees. This allows for enough space to accommodate both sets of surgical
teams and simultaneous operation. At our institution, the OMS team begins in the head and neck area while
the ENT team begins with the fibular dissection. Two scrub teams are required with two sets of instruments,
one dedicated for the head and neck, and one dedicated for the fibula. Additionally, a DI and prosthetic
setup will be required since much of this work will be done in situ at the fibula. Since the implants are
placed in situ, a skull model with the opposing dental arch is critical for the prosthodontic team to use to
refine the provisional prosthesis. This limits manipulation of the flap after inset and microvascular
anastomosis at the head and neck.
Operative procedure
The ablative surgeon makes a mastoid to mastoid visor-shaped incision 2 cm below the inferior border of
the mandible and dissects through the skin and platysma. A combination of sharp and blunt dissection
should be used with diligent nerve monitoring to preserve the branches of the seventh cranial nerve. When
the facial arteries are encountered, they are clipped, divided and preserved for later anastomosis. As the
pterygo-masseteric sling is approached, it is incised carefully to expose the mandible underneath and divide